If you are searching for the best portable soccer goals for backyard use, the most useful thing you can learn is how these goals fail. Price and size matter less than whether the frame bends, the joints crack, the net tears, or the goal blows across the lawn in the first strong wind. Most disappointment with backyard goals traces back to one of those four problems.
This guide sorts portable goals into three types (pop-up, folding frame and tube frame), shows you how to check durability and storage before you buy, and matches each type to a kind of yard. It does not name brands or quote specs, because those change and you should confirm them on the listing in front of you.
Why most backyard goals fail within a season, and where they break first
A backyard goal takes repeated hard shots at the same spots, sits outside in sun and rain, and gets folded and unfolded far more often than anyone plans for. Each of those stresses a different part.
The parts that usually give out first, roughly in order:
- Net attachments. Clips, ties and hooks pull loose or snap where the net meets the frame, and the net starts to sag or flap.
- Corner joints and connectors. Plastic connectors crack, especially after sun exposure and cold weather, and a cracked corner makes the whole frame wobble.
- Net netting and stitching. Corners and the places where the net rubs against the frame wear through first. A hole there grows quickly.
- Frame tubing or wire. Thin tubes bend under hard shots, and flexible frames can kink if they are folded the wrong way.
- The goal’s position. A light goal that gets hit or caught by wind moves, tips or gets dragged, and that causes more damage than the shots do.
Knowing this changes how you shop. A goal with a strong crossbar but flimsy corner connectors will still fail, and a heavy frame is a poor buy if it is so awkward to break down that it ends up left outside all winter, where weather finishes it.
Pop-up, folding or tube frame: the three portable goal types compared
Each type makes a different trade between speed, strength and how much room it takes up in storage.
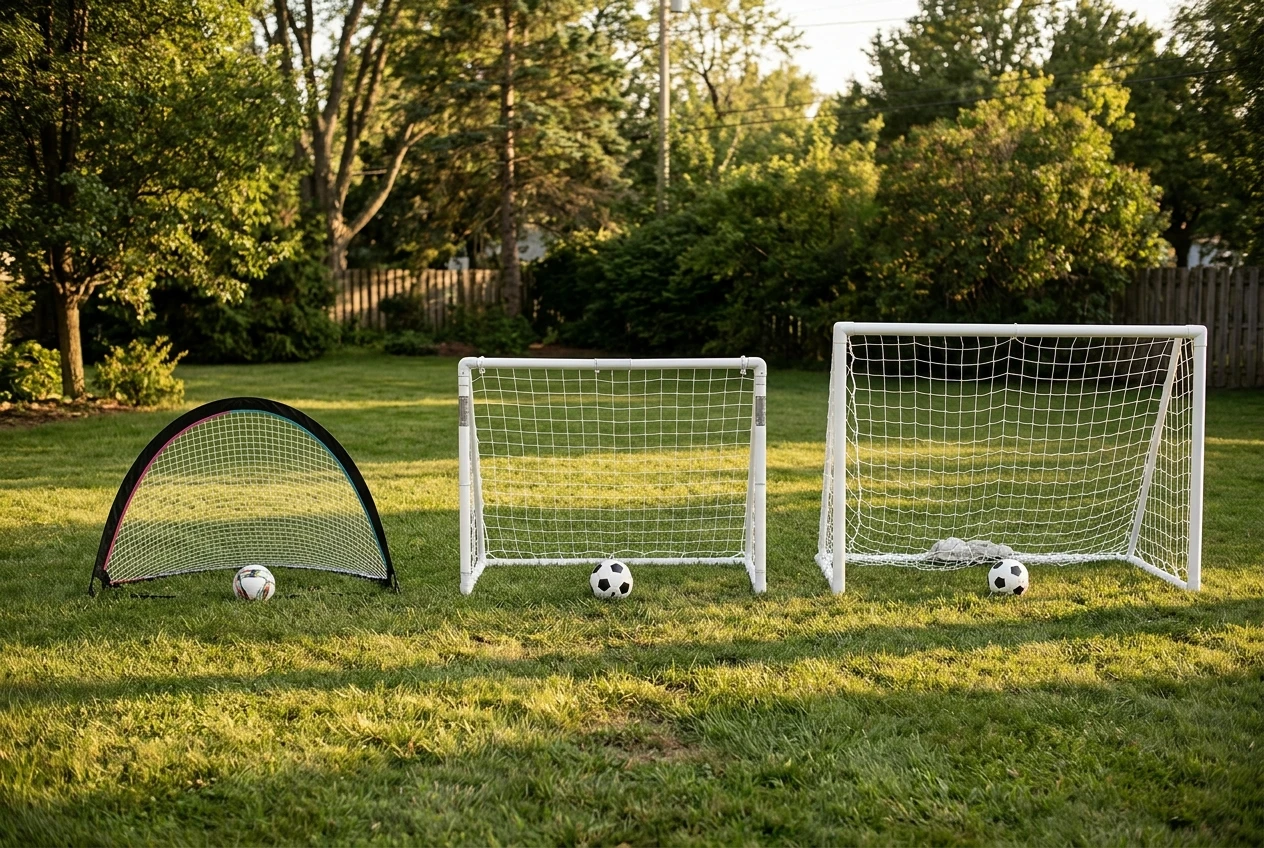
Pop-up goals
A pop-up goal uses a flexible frame covered in fabric or integrated with the net. It springs open when you release it and twists down into a flat circle or small disc. It is the quickest to set up and the smallest to store, which is why it suits tight garages and apartments with a patch of shared grass.
The trade-off is weight and rigidity. These goals are light, so they move when struck and need anchoring in any wind. The flexible frame also absorbs hard shots by moving, so a powerful striker may find the goal shifting or folding on impact. Folding it back down takes a technique you should learn from the instructions, since a wrong fold can kink the frame.
Folding frame goals
A folding frame goal has a rigid frame with hinges at some joints, so it collapses into a flatter, narrower shape without being fully taken apart. Setup is usually a matter of unfolding and locking the hinges, and the net often stays attached.
Hinges are the point to watch. Every hinge is a joint that can loosen, rust or crack, and a lock that does not fully engage makes the frame unsafe under a hard shot. These goals sit between pop-ups and tube frames in weight, rigidity and storage size, and the quality range inside this category is wide.
PVC or metal tube frame goals
A tube frame goal is built from separate straight tubes that connect through corner and T-shaped joints, with a net draped and fastened over the top. It takes the longest to build and break down, and it needs a long, flat space in storage because the tubes are rigid.
In return, a well-built tube frame is the most solid of the three and handles hard shots best. PVC is lighter and cheaper, but it can become brittle with sun and cold over time. Metal tube is heavier and sturdier, but it can dent or rust where coatings wear. In both cases the connectors, not the tubes, decide how long the goal lasts.
How to judge durability before you buy
You cannot test a goal in a store when you are buying online, but the listing and the reviews give you enough to judge several things.
Frame material and thickness. Look for the frame material and, if listed, tube diameter or wall thickness. A listing that states neither tells you the seller is not confident about the number. Between two similar goals, the one with clearly stated frame details is the safer choice.
Joints and connectors. Check what the connectors are made of. Metal connectors or reinforced joints generally take stress better than thin molded plastic. For folding goals, look at the hinge and lock mechanism in the photos: is it a simple pin or a lock that seats fully?
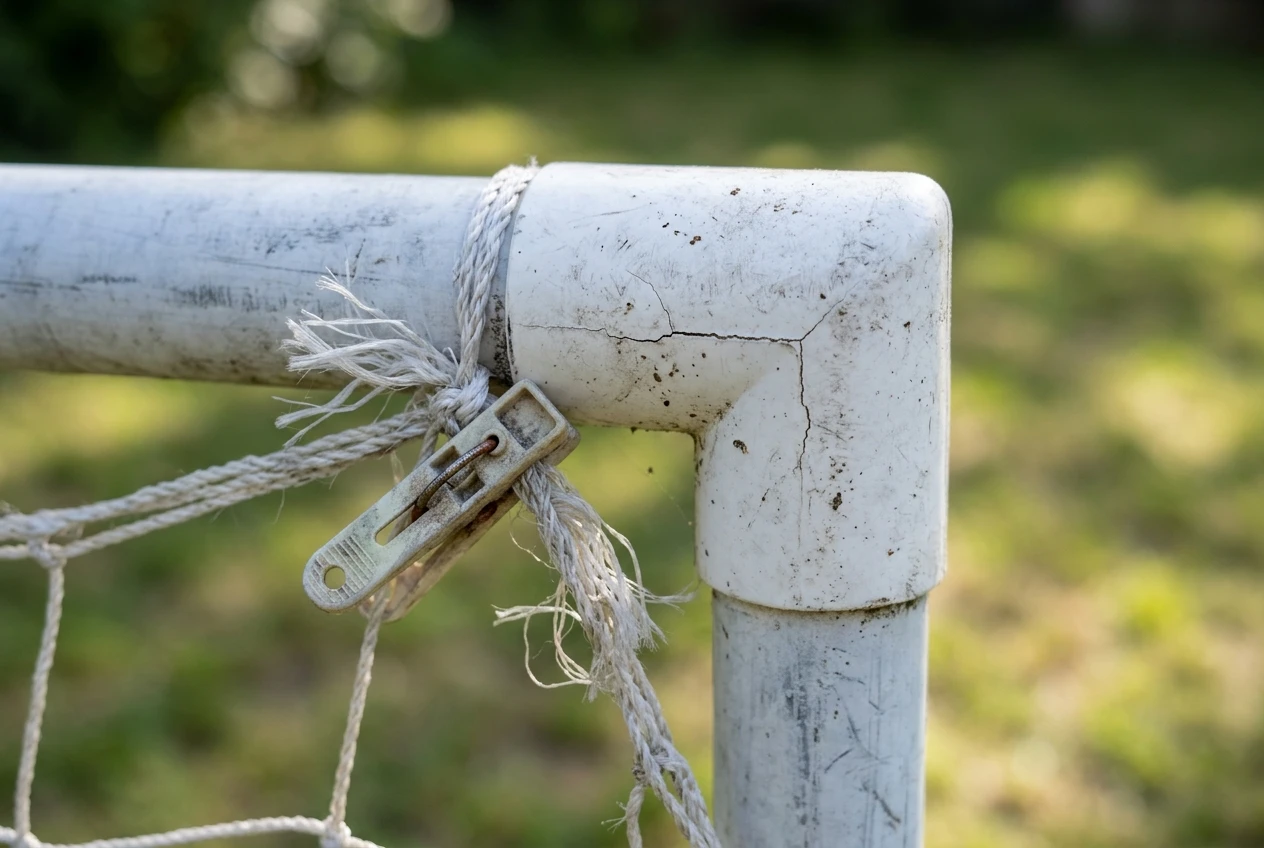
Net and stitching. Look for reinforced edges and corners, and for how the net attaches to the frame. Many small attachment points spread the load better than a few. Be wary of nets that look stretched tight on the product photo, since tension on a net under a hard shot is what pulls the attachments loose.
Weather claims. Treat phrases like “weatherproof” or “UV resistant” as claims to weigh, not guarantees. If a manufacturer does not say what the material is, the phrase carries little information.
Reviews from months later. The most useful reviews are written after a season of use. Search the review text for words like “cracked,” “bent,” “tore,” “snapped,” “blew,” and “rusted.” If the same part shows up in several complaints, that is the weak point of that model.
Spare parts and returns. Check whether replacement nets or connectors are sold separately and what the return window is. A goal with replaceable parts can survive a failed net, while a goal sold as a single unit may be thrown away over one broken piece.
Anchoring and wind: keeping a light goal safe and in place
A portable goal that is not anchored can tip or slide, and a tipping goal can injure a child. This applies to every type but matters most for pop-ups and light folding frames.
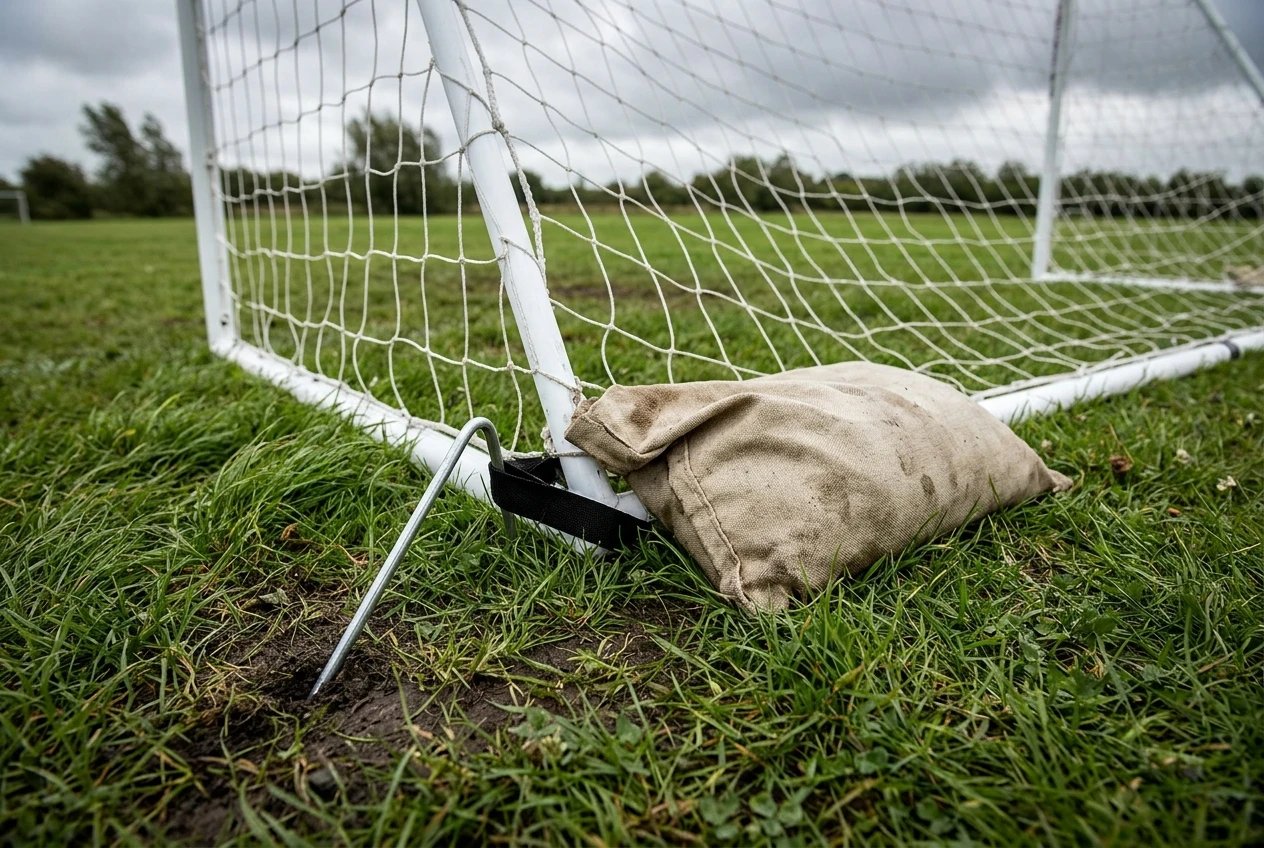
Practical steps:
- Use the anchor points the goal provides. Many goals include pegs or loops for them. Push pegs in at an angle, away from the goal, so they resist pulling.
- Add weight at the base. Sandbags or similar weights placed over the rear bars or base of a frame lower the chance of tipping. Check that the goal has a suitable place to set them.
- Check the ground. Pegs hold well in damp, firm soil and poorly in dry sand or loose ground. On patios or hard surfaces, weights are the only option.
- Take it down when wind is forecast. A light goal that is not anchored will move in a strong gust. If it is not worth anchoring for the weather, it is not worth leaving up.
- Keep children off the frame. Hanging from or climbing on the crossbar is the usual way a goal tips over. Make that a household rule from day one.
If a listing gives no anchoring method at all, assume you will need to improvise one, and factor that into your decision.
Storage test: how each type breaks down, what it packs into and how long setup takes
Storage is where many people end up regretting a purchase, so run a quick test on paper before ordering. Find these numbers on the listing and compare them with the space you have:
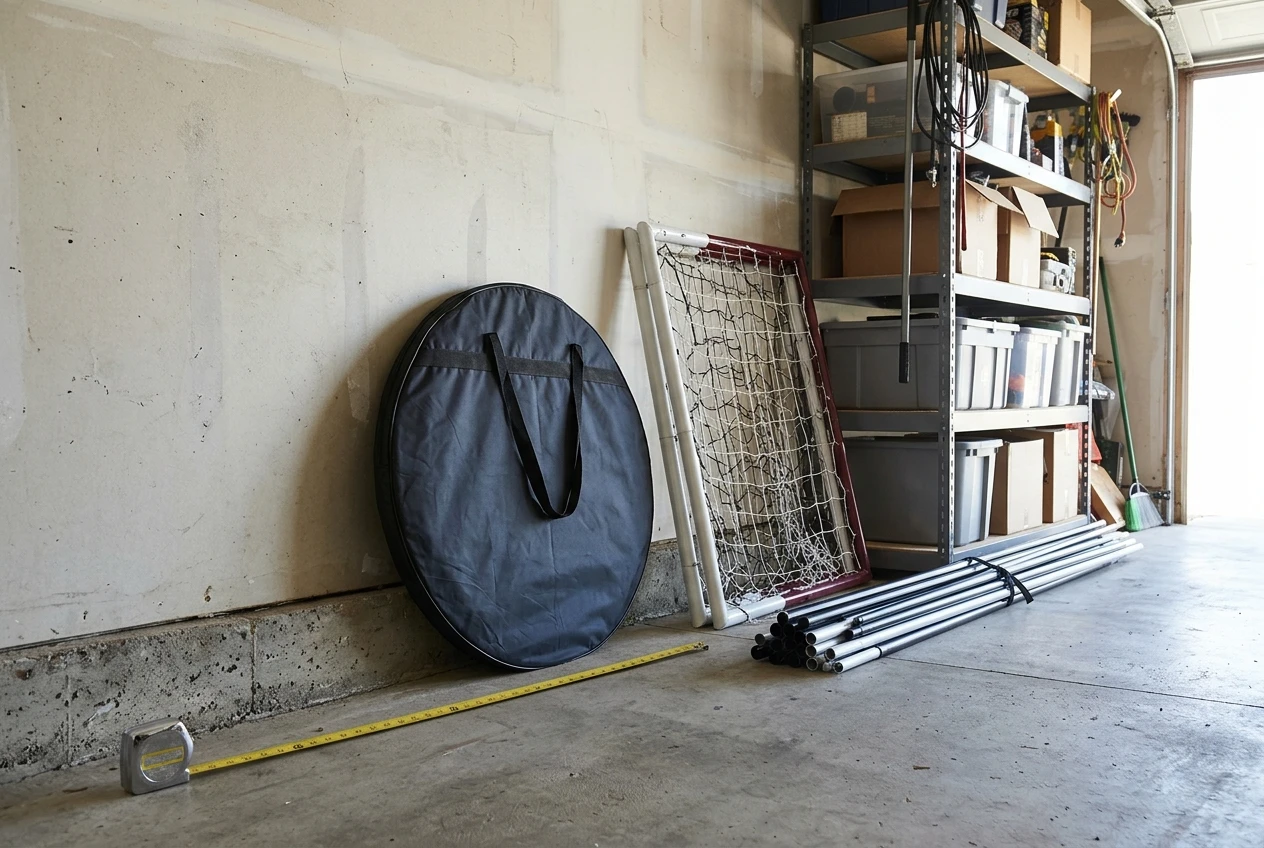
- Packed size. Measure the shelf, corner of the garage or shed wall where the goal will live. Compare the listed folded or packed dimensions, and allow extra room for the carry bag.
- Longest piece. For tube frames, the longest tube sets the minimum storage length. If the longest piece is longer than your shed’s shortest wall, the goal will not fit however neatly you stack it.
- Weight. If you will carry it from storage to the lawn several times a week, weight matters. A goal that is awkward to lift gets used less often.
- Part count. Count the pieces. More pieces mean more places to lose a connector and more time spent each session.
- Setup steps. Read the instructions or reviews for how long setup takes in practice. Pop-ups take moments, folding frames take a few minutes, and tube frames take the longest.
A practical rule: the goal you will actually set up is the one you will keep using. If a three-minute setup becomes ten minutes, the goal tends to stay folded in the shed.
Type Setup effort Packed shape Main durability concern Pop-up Lowest Flat disc or small bundle Light weight, frame kinks, movement on impact Folding frame Moderate Flat, narrow frame Hinges and locks Tube frame Highest Long bundle of tubes Connectors, PVC aging in sun and cold
Matching goal size to the player’s age and your actual yard
A bigger goal is not automatically better. A goal that is too large for a young player makes scoring too easy and stops them aiming for corners. A goal that is too large for the yard sends balls into fences, flowerbeds and windows.
To size it properly:
- Measure the yard. Note the width, length and where the ball is likely to travel when a shot misses.
- Mark the footprint. Lay out cones, or anything similar, to show the goal’s width and depth. Check the listing for the depth of the back bars, since that space is easy to forget.
- Leave a shooting distance. Make sure there is enough room in front of the goal to take a real shot, not only a tap-in.
- Match to the player. Younger players generally do better with a smaller goal that they can aim at. A goal they can nearly cover with their arms is easier to practice on at their age. As a player grows, a larger goal makes sense, though only if the yard can handle it.
- Think about stray shots. A ball stop net or a fence behind the goal protects your property and saves chasing balls down the street.
Compare your measurements with the dimensions in the listing rather than relying on size labels like “youth” or “junior,” which vary between sellers.
Which goal type fits which backyard, with picks by situation
Here is how the three types line up against common situations.
- Very small yard, apartment lawn or shared space, and limited storage. A pop-up is the practical choice. Anchor it every time and keep expectations realistic for very hard shots.
- A yard where the goal goes out and comes in several times a week. A folding frame is a fair middle option, provided the hinges and locks look solid in the photos and reviews.
- A dedicated corner where the goal can stay up for the season. A tube frame, ideally metal or with strong connectors, gives the most rigidity. If you choose PVC, plan to check the connectors regularly and take it down for the worst winter weather.
- An older or harder-shooting player. Lean toward a tube frame with metal parts and solid connectors, or a sturdy folding frame, over a pop-up.
- Younger players and casual play. A pop-up or lighter folding goal usually covers it, and the smaller storage footprint often matters more than top rigidity.
- A yard that is windy or exposed. Choose a goal that has proper anchor points and can take sandbags, and plan to take it down in storms whatever the type.
If two goals look equal, pick the one that sells spare nets and connectors. A repairable goal lasts longer.
Pair it with solo practice gear you may already own
A goal gives a player something to shoot at, but a lot of useful practice does not need one. A wall, a rebounder, some cones and a ball cover passing, first touch and finishing work, and these can share the same storage space as the goal.
If you want to round out the setup, the Affordable Soccer Training Equipment guide covers low-cost gear for backyard practice. If a player trains alone often, the soccer rebounder comparison looks at durability, ball return and setup so you can choose one that fits next to your new goal.